Posts Tagged With: summer

Three-layer Peach, Raspberry and Brown Sugar Pavlova

IMG_0461

One would have no idea summer is winding down here in D.C.  The heat and humidity loping through the campus turn us all lethargic and in need of a dunk in the ocean.  Alas, schoolwork and projects beckon, and rather than exercise my need for R&R, I’ve settled on food as an escape.

Not entirely surprising, is it ?

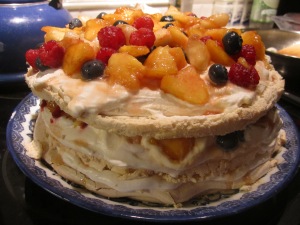
In any case, PEACHES have been my ambroisia of oubli, and with a weekly farmer’s market, they aren’t difficult to procure.  Most recently, I re-made Nora Ephron’s Peach Pie (click the link for the recipe), and it disappeared in a day.  This is the problem with having roommates: as the cook, you want to share !  But BAMPOOFPOW – it’s all gone !  It’s definitely “bittersweet,” shall we say.  In any case, before I left my little town, I attended our local peach festival (yes, we have one of those) with a friend of mine.  While picking peaches, I declared that I would make SOMETHING with these gems that wasn’t a peach pie.  This mixed fruit pavlova is the “fruit” of said declaration.

Pavlova is a meringue-based dessert that is very light and fruity.  Because it’s all egg whites, there is no added fat (eg butter/oil), so if you are “reducin’,” as my grandmother would say, it’s a nice choice for dessert.  Each pancake of meringue sits on a bed of whipped cream (you don’t need this part if you’re not partial to chantilly) and cut fruit (such as mixed berries, peaches, nectarines, plums, etc).  Rather like a trifle, this dessert needs to be eaten the night you prepare it, or else it will get soggy.  It’s an excuse to devour an entire treat in one sitting…right ?  And it’s covered in fruit !  Fruit is healthy !

Grab some peaches before the season really ends and whip up (literally) this lesser-known dessert as one final tribute to the groove of summer.

For the meringue :

Confectioners’ sugar (for dusting)
1 cup granulated sugar
1/2 cup packed light brown sugar
1 1/2 tbsp cornstarch
1 1/2 tsp vanilla
2 tsp distillled white vinegar
3/4 cups egg whites (5 to 6 large eggs)

Directions :  Preheat the oven to 275F with rack placed in the middle of the oven.  Line three 8” round cake pans with parchment paper, dusting the sides with confectioners’ sugar.

IMG_0407

Pulse the sugar, brown sugar, and constarch in a food processor until well combined.  You can also whisk these ingredients together if you, like me, are often sans fancy kitchen appliances.

IMG_0399

Stir together the vanilla and white vinegar.  Don’t smell it…you won’t be pleased.

IMG_0400

Beat the egg whites with a pinch of salt using an electric mixer (or your brute strength, however you like) until they hold soft peaks.  Increase the speed to medium-high and add the sugar mixture 1 tbsp at a time.  It doesn’t have to be a perfect tbsp – think of that measurement as a speedbump – as you just don’t want to add the sugar too quickly.

IMG_0403

After all the sugar has been incorporated, beat for 1 minute more.  Add the vinegar mixxture, then beat at high speed until meringue is glossy and holds stuff peaks: about five minutes.  Spoon meringue into pans and smooth the tops.  I used a pastry bag, but this is not at all necessary (unless you feel like a perfectionist).

IMG_0408

IMG_0412

Bake the meringues until they have a crisp crust and feel dry to the touch – about 1 hour.  Meringues may sink while cooling – but have no fear !  It just means more space for berries and cream !

IMG_0415 IMG_0416

Turn oven off, prop door open with a wooden spoon (or ruler tool), and cool the meringues for 1 hour in the oven.  You want to keep them in a dry environment so that they don’t go all soggy…and the oven is the closest thing to the desert one has in a kitchen….except maybe for the brisker, but everyone knows briskers often carry a strange scent after re-crisping one too many boxes of crackers.

IMG_0434

Run a knife around the edges of the cake pans and remove gently.  MERINGUES ARE FRAGILE.  BE CAREFUL.  (But not too careful…because who doesn’t love to mop up the crumbs ?)

For the fruit topping :

2 white peaches
2 golden peaches
1-2 cups raspberries
1 cup blueberries (if desired)
A little liqueur – I like “peche” but cassis, chambord/framboise or a blueberry syrup would be delicious as well.  Do not add sugar to the berries if you use a “berry” sweet liqueur (Brian, that one is for you).

This part is really quite simple:  Peel the peaches (if desired) and cut them into sections.

IMG_0420 IMG_0423

You don’t need to cut them into smaller chunks, but I did simply because it makes the fruit more uniform.  Place into a bowl and add the raspberries and blueberries.  Give it a quick stir and drizzle some liqueur over the top, if desired.

IMG_0429

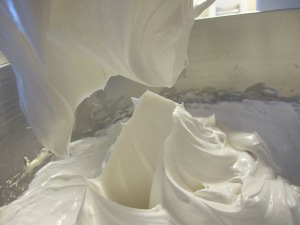
For the whipped cream:

1 1/3 cups heavy cream
Sugar (just a tablespoon or two will do)
Vanilla – a dash

Whisk until thick, creamy, billowy, delicious, and…well…whipped !  I used an electric mixer and added the sugar just as the cream began to thicken.

IMG_0441

Assembly :

Start by placing one layer of meringue on your cake plate.  Place it flat side down – this will ensure overall stability of the pavlova palace you are about to craft.

IMG_0438

On top of this, spread a nice layer of whipped cream.  Top with berries (I forgot this step !)

IMG_0444

Place the next layer of meringue on top and follow the same pattern : whipped cream followed by fruit.

IMG_0446 IMG_0450

IMG_0455

IMG_0461

Serve very soon after preparation as those meringues won’t last long surrounded by fruits.  It may not be the most elegant dessert, but it is marvelously tasty.

Bon appétit ! 🙂
IMG_0467

Categories: English | Tags: , , , , , , , | 1 Comment

Du pain et plus de pain et seulement le pain

photos classe celine 111  IMG_0307

Mon amie et moi avons visité l’Italie l’été dernier, et nous l’avons adorée! Alors, nous avons décidé que nous aimons le pain! Tout le pain! Nous faisons le pain tout le temps, et maintenant, nous avons un magasin de pain. Beaucoup de gens l’aime et notre pain est toujours très réussi. Notre magasin s’appelle “Du pain et plus de pain et seulement le pain”. Nous sommes très connus pour nos baguettes. C’est notre pain préféré. C’est très amusant de cuisiner!  Une classique!

Les ingrédients:

4 tasses de farine
3 tsp (c.à.c) de levure boulangère
2 tsp (c.à.c) de sel
1 1/4 tasses d’eau chaude
Un peu d’huile d’olive

Les étapes:

1. Mettez la farine, la levure boulangère et le sel dans un grand bol. Mélangez rapidement avec une cuillère.

Atelier cuisine 102 Atelier cuisine 109 Atelier cuisine 112

2. Dans une tasse, ajoutez l’eau chaude (1 minute dans le micro-onde devrait marcher).

3. Ajoutez l’eau chaude au mélange de farine et travaillez le tout avec vos mains. Quand la pâte commence à faire une forme (comme un cercle), versez le tout sur la table.

Atelier cuisine 113Atelier cuisine 120 Atelier cuisine 136

4. Travaillant avec les mains, pétrissez la pâte pour 10 minutes. Mettes la pâte dans un saladier pendant 1 heure pour reposer.

5. La pâte devrait être gonflée; frappez-la pour faire échapper le gaz de la levure. Diviser la pâte en quelques morceaux afin de modeler de petites cercle.

Atelier cuisine 142

6. Faites un baguettes avec la pâte. Pliez les deux “coins” de ce cercle pour faire un triangle. Roulez le bas du triangle pour faire la forme d’une baguette, comme un cylindre.

Atelier cuisine 151 Atelier cuisine 158

7. Mettez les baguettes sur une plaque à four. Laissez reposer la pâte pendant 30 minutes, puis mettes-les dans un four chaud (475F) pendant 30 minutes (à peu près).

Atelier cuisine 160

Bon appétit ! 🙂

IMG_0304

Categories: Uncategorized | Tags: , , , , , , , , , , , , , , | 1 Comment

Lemon Ginger Scones

2013-07-03 21.09.48

Well, it seems like time has gotten away from me.  Skittered,  Scattered. Slunk.
You know what hasn’t seemed to disappear, however ?
The heat.
The past, oh I don’t know, week or so has been hot and humid in my neck of the woods.  Every morning, walking to work (after the car and train ride, I might add), I am just covered in an unhappy film of dog day perfume: perspiration.  In such oppressive heat and humidity, nobody wants to cook.  In my house, we’ve been creating cold salads, grilling often, and even toasting breakfast outside in an effort to keep the oven dormant and cold.

Yes, I am using the heat as an excuse for my miserable updating skills.  As a result, in celebration of this lovely, cool evening, I’m adding a fabulous morning treat otherwise entitled “Lemon Ginger Scones.”  Around here, we don’t have a lot of entertainment…trees, birds, boats, testing pontoons in a pool…maybe not that last one, but the novelty of going to the General Store for breakfast never seems to wear off.  What to order ?  Scones.  Scones scones scones scones.  And a cappuccino (if you’re me; others prefer americanos).  In any case, it dawned on me that while I will always love the 2 mile trek down the road, making my own scones is also an option.

Therefore, when my mom showed up with a bag of candied ginger, we were off to the races.  These scones are aromatic and spicy with an almost-authentic texture thanks to the use of plain yogurt.  You cannot make these without real, candied ginger.  It will not taste the same.  Go on, take a risk and purchase this odd ingredient because its presence adds fabulous bursts of flavor in every bite of scone.  It also pairs fantastically with coffee, a fried egg, and perhaps some cheesy grits.

Ingredients :

2 1/4 cups flour
1/3 cup sugar
1 tbsp baking powder
1 tsp lemon zest + the juice of a lemon
1/2 tsp lemon extract (if you are lemon fans)
1 1/2 sticks unsalted butter, frozen and chopped
4 1/2 oz candied ginger (about 2/3 cup), chopped into small chunks
1/2 cup half and half
1/4 cup plain yogurt

Preheat the oven to 400F.  Using a food processor fitted with a steel blade, combine the flour, sugar and barking powder.  Pulse on low to incorporate.  If you don’t have a food processing machine, it’s okay – just use a spoon to mix together these three ingredients.

2013-07-03 20.00.45

Add the lemon zest, butter, lemon juice and extract.  Pulse on and off, until the mixture is pale yellow and crumbly – you should be able to press it between your fingers and it will make a loose ball. If  you are without a mixer, just knead the butter in with your hands – the heat from your fingers will render the butter easier to work with, but be sure to begin with VERY COLD BUTTER.  If it warms up too much, it will change the texture of the scone and the consistency of the batter.

2013-07-03 19.56.46 2013-07-03 20.05.54 2013-07-03 20.14.05

Transfer the mixture to a large bowl and stir in the ginger.  In a small bowl, combine the yogurt and the cream, stirring to make a smooth mixture.  Make a well in the ingredients; pour the dairy into the flour combo and stir with a spoon or your hands – whatever you prefer.  I like to get messy in the kitchen, so I’ll use my natural appendages to mix, but don’t hesitate to use a little tool here and there.

2013-07-03 20.19.42
2013-07-03 20.23.16
2013-07-03 20.25.18

Turn the dough out onto a floured surface.  Roll out until it’s about 3/4 of an inch thick.  Cut into rounds – just as I did for the strawberry shortcakes, I used a glass to make nice circles to great effect.  Place into a greased baking sheet, spaced about 1 inch apart from each other.

2013-07-03 20.30.27 2013-07-03 20.30.43 2013-07-03 20.35.29

Brush the tops with cream, drizzle with some raw sugar if you so desire, and bake for about 14 minutes or until just beginning to brown.

2013-07-03 20.37.26

Devour with a hot cup of coffee and a beautiful summer morning.  Bon appétit !

2013-07-03 21.15.14

Categories: English | Tags: , , , , , , | 2 Comments

Grilled Pork Tenderloin with Goat Cheese and Figs

[^that title is quite the mouthful, but any other description escapes me.]

2013-06-23 06.42.07

It has come to my attention that my blog has turned into a bakery.  I love bakeries.  Bakeries are great places, full of fun smells, bright colors, and lots of flour.

But you can’t really live off of bakeries.  Eating only bread and cookies doesn’t really get one very far.  So, in an effort to change things up a bit, here’s a savory dish I discovered while perusing Epicurious, that fabulous anthology of recipes that has yet to fail me.

A common complaint from the familial peanut gallery lies in the abundance of chicken dishes that grace the kitchen table.  We seem to eat only chicken with the occasional night of RED MEAT (ooooooo).  Indeed, we are still a carnivorous household despite a lot of societal pressures to go vegetarian.  When these grumbles arise, I often suggest pork…the “other white meat.”  I’ve always liked pork; my family, however, never got on the hog wagon and it’s a battle to convince madre to purchase a tenderloin.

This go around, I seem to have worn down the ranks and upon pitching my recipe suggestion, the parents ran off to purchase fresh figs, a first for us, and a nice pork tenderloin for grilling.  Something about the combination of sweet from the figs and honey to the savory from the goat cheese, pork, and aromatic rosemary must have piqued the interest of a few finicky Froths.  This recipe is probably the easiest recipe around for summer as you just need a grill to make it a reality.  Oil up the figs and meat, place on grill, cook, cut, drizzle with honey, and eat….rather like this.

Ingredients:

One (1 to 1 1/4 pounds) pork tenderloin
2 tablespoons olive oil
Fine kosher or sea salt and freshly ground black pepper to taste
12 small ripe figs
Goat cheese
Honey
1 1/2 teaspoons finely chopped fresh rosemary (I only had dried…oh well !)

Crank up the grill and get it very hot.  For this, I enlisted my dad, as he is known as the grillmaster of the house.  It’s also nice to shoo him outside every once in awhile…but shh, don’t tell him.  Back in the kitchen, bush the tenderloin with olive oil and season with salt, pepper, and rosemary.  Bring out to the grill when ready.

2013-06-23 05.59.47

Rinse the figs and pat dry. Pierce the figs through the middle with a metal skewer – do not peel.  Lightly brush the figs with olive oil and season with a little coarse salt.

2013-06-23 06.01.40

Place the pork tenderloin directly over the fire. Grill for 2 to 3 minutes per side (the center-cut pork loin filet for 5 to 7 minutes per side), turning a quarter turn at a time, until an instant-read meat thermometer inserted in the thickest part registers 140°F for medium and the meat is juicy and slightly pink in the center.  (This is what the original recipe says – we cooked it longer). If you have a nice cut of meat and you know it is FRESH FRESH FRESH and from a happy hog, I’d say follow the directions and embrace a pinker meat.


2013-06-23 06.02.57
2013-06-23 06.03.50

At the same time, place the skewered figs over the fire, turning several times and cooking for about 5 to 6 minutes until they are heated through. When they’re caramelized and soft, remove the skewers from the heat and keep warm.  I just poked them and when they were squishy and smelled like slightly burnt sugar, we placed them on a platter.

2013-06-23 06.20.14

Let the pork rest for about 5 minutes, and then cut on the diagonal into 1- to 2-inch-thick slices.  Unless you’re impatient…

To serve, alternate between pieces of pork and goat cheese, with the figs on the side.  Drizzle a liberal amount of honey over the platter (believe me, you won’t regret this decision to be generous with this honeybee glory) and top with a few shakes of dried rosemary.

2013-06-23 06.34.52

For dinner, we served it with quinoa and arugula salad.  All the elements worked nicely together: the pork, fig, and goat cheese combination is sweet and is therefore nicely contrasted by the bitter and peppery arugula.  Quinoa, as a side, adds texture and serves as a palate for the softer components of the dish.   All in all, a fabulous meal.

2013-06-23 06.35.11

Bon appétit !

Categories: English | Tags: , , , , , , , , | Leave a comment

Strawberry Shortcakes

IMG_9660

While at school, I happened to have coffee with a professor (on multiple occasions, as she always manages to put a smile on my face and a spring in my step regardless of pre-existing grumbles).  As we plowed through a myriad of different conversation topics, we fell upon cooking.  In a wonderfully kind and enormously appreciated gesture, this professor [knowingly] enabled my procrastination abilities and handed me a tote bag full of old Cook’s Illustrated magazines, sticky-noted with suggestions and recipes that she uses for her family.

Needless to say, I was in heaven.  (Still am, actually…definitely a good example of the imperfect tense in French – not only an emotion, but a state that began in the past and continues to the present.  Merci à vous, chère prof extraordinaire !)

Cook’s Illustrated is a fantastic review of recipes published after immense scrutiny.  As a result, the recipes that make the cut are polished and often foulproof.  Furthermore, the pages include scientific reasons why certain ingredients fail and other succeed – handy to note if ever one needs to do a little ingredient switcheroo.

Bref, upon hitting these “lazy” summer months, I’ve been reading through these Cooks Illustrated like it’s my job…which it isn’t…but that’s alright !  In so doing, I’ve copied multiple recipes including this fabulous strawberry shortcake concoction from the 1997 May/June issue.  I’ve made shortcakes before, but they never have quite the proper consistency.  This go-around, I was pleased to discover a nice, scone-like shortcake that was so easy to make, the dessert was ready in under an hour (20 minute prep, 20 minute cook/cool).  For a family that loves spontaneous sweets morning, noon, and night, a quick fix is a popular one.

June is strawberry time in MA, and we’ve been nibbling on native berries that are small but incredibly sweet.  Whip up (or roll out) some shortcakes while this fruit is still in season !

Topping :

3 pints strawberries (Mash 1 pint, quarter the other two)
6 tbsp sugar (optional !  If those strawberries are really fresh, just add 1-2 tbsp)
Squeeze of lemon if desired.

Wash the berries and pat them dry.  The recipe divides them by pints, but I just did it by handful – one handful of mashed berries to two handfuls of intact berries.  I don’t have a way to measure a pint in the kitchen, so I rely on my eyeballs.  Mash the berries with a fork – they don’t need to be beaten into a pulp, just macerated enough to release some of the juices and make a faux (well, fausse) sauce.

For the “intact” berries, hull and quarter them.  Hulling is very easy – pull back the stem, run the knife around the center of the berry, making a cone shape, then pull it out and discard.

IMG_9632

IMG_9633

IMG_9634

IMG_9636

IMG_9631

Cut the berry into quarters, put in a bowl with the sugar (as little or as much as you prefer – I didn’t need much due to the freshness of the berries).

IMG_9638 IMG_9642

A little lemon juice is pleasant as well, as is Grand Marnier liqueur. Let this sit while you prepare the shortcakes.

Shortcakes :

2 cups flour
1/2 tsp salt
1 tbsp baking powder
3 tbsp sugar; 2 tbsp for sprinkling (5 total)
1 stick butter, frozen
1 egg, beaten
1/2 cups + 1 tbsp half and half
1 egg white, lightly beaten

Preheat the oven to 425F.  In a medium bowl, mix the flour, salt, baking powder, and 3 tbsp sugar.  Mix together to evenly distribute the ingredients.  Set aside.

IMG_9589

Grab that stick of FROZEN butter.  Using a large cheese grater, grate the butter onto a plate (or directly into the dry ingredients, if you are strong enough to do so.  I am a weakling and cannot grate while holing our [broken] grater).  I put a plate or a paper towel on top of the counter and therefore grate straight up and down rather then on an angle.  I found it was easier to do it this way, if not simply for the well-being of my whisk-worn wrists.  Toss the butter curls into the flour mixture.

If you don’t have a grate, fear not !  Simply cut the butter into small, workable pieces and mix them into the flour mixture.

IMG_9590 IMG_9594

Using your hands, work the butter into the flour until it forms large clumps and resembles cornmeal…or almond flour.  You should be able to squish the dough between your fingers and it will momentarily keep its shape.

IMG_9601

Mix the beaten egg with half and half; pour it into the flour mixture.  I made a hole in the dry ingredients and emptied the egg combo into the center of the flour, then mixed with a fork.  Stir until large clumps form.

IMG_9603 IMG_9606 IMG_9608

Turn mixture our onto a floured work surface and lightly knead until it comes together – this shouldn’t take long nor a lot of flour – it’s a sticky, soft, loose dough.  Just make sure the countertop is nicely floured and you shouldn’t have any problems.

IMG_9609

Pat dough into a 9-by-6” rectangle (well, that’s rather fussy, isn’t it ?) that is 3/4 inches thick. I would just estimate a nice rectangle that is about the thickness of your pinkie nail.  The cakes will rise in the oven, but not excessively, so keep that in mind when you are patting out the dough.  Cut the dough into 6 rounds (or more, depending on how thick or thin you made your dough).  I used a glass as my “cookie cutter” and it worked perfectly.  Place over the dough, press, turn, and lift – works like a charm.

IMG_9610 IMG_9612

Place 1 inch apart on a large baking sheet.  Brush the tops with eggs whites and sprinkle with remaining sugar – if you have turbinado sugar, or raw sugar, I think that would be excellent.

IMG_9613 IMG_9618 IMG_9624

Bake until golden brown – probably about 12-15 minutes in a hot oven.  Upon removal, let the cakes cool until warm, about 10 minutes.

IMG_9647 IMG_9649

To serve, split each cake cross-wise and plop a hearty spoonful of vanilla ice cream in the center.  Spoon berries over ice cream and maybe a little whipped cream, and serve on a back porch on a warm sumer night !

IMG_9659

Bon appétit ! 🙂

Categories: English | Tags: , , , , , , , , | 2 Comments

Create a free website or blog at WordPress.com.